Do you have a brother wireless printer but finding it difficult to set up the printer? Here is how you can connect your printer over the wireless connection to your PC. This post will also help you set up the Brother printer with a computer and router and then enable you to connect the Brother printer to wifi. Please read the post till last-
Contents
Connecting Via Wireless Direct
One of the most common ways of setting up a wireless brother printer is to use Wireless Direct, with which you can connect your printer to your mobile or your computer without having a Wifi access point. By using wireless direct, the printer will work as a wifi access point. if you looking for How to connect brother Printer to wifi follow the methods given in the post.
Follow the steps given below to set up your wireless Brother printer to wifi Direct.
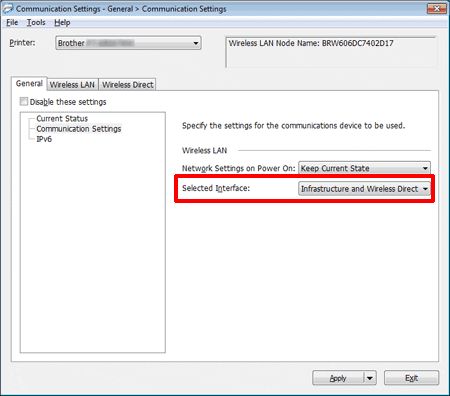
- First, set up the wireless direct settings of your printer with your PC. For Windows PC, connect your printer to your computer with the help of a USB cable. Now open the printer setting tool on your computer and click on the Communication settings button.
- Now go to the general tab and confirm that the wireless direct is selected for the selected interface.

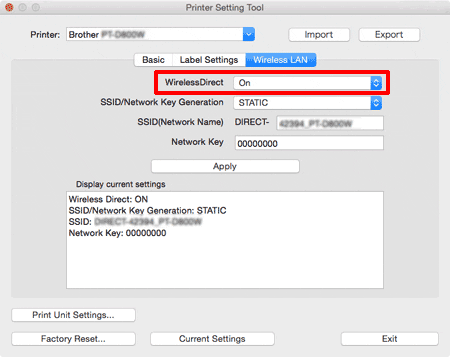
- If you are using a Mac computer, connect your printer and your computer via a USB cable, and start your printer setting tool. Once the printer setting tool is opened, confirm that the wireless tab is on under the Wireless LAN tab.

- Now press and hold the wifi button on your printer for a second, and this will turn on the wifi on your printer. To ensure that wifi is on, check that the blue light keeps on flashing every three seconds. If the indicator flashes the blue light every three seconds, then your wifi is on.
- Now use the device for which you want to set up your computer, select the SSID of your printer and enter the password. you can also find the default brother printer password to login to brother printer.
Connecting via infrastructure mode
Using this method, you can connect your printer to your mobile or your computer with a Wifi access point.
- First of all, you will have to configure your printer’s wifi settings to communicate with your wifi access point. Once you have configured the wifi settings, all the devices connected to your wifi access point will access the printer.
- Now connect your computer to your printer via USB cable.
- Turn on the wifi on your printer by pressing the wifi button on your printer for one second.
- Now you will have to configure the settings of the infrastructure mode of the printer. If you are using Windows PC, then open the Printer Setting tools on your computer.
- Now under the General tab, select Wireless LAN for the selected interface. Under the Wireless LAN tab, go to wireless settings, and select infrastructure for communication mode. If you are using a Mac computer, start the wireless device setup wizard, which is included in the Printer driver package.
- Now enter the SSID and the password and click on apply. When the connection is successfully established between the computer and the printer, the indicator light will turn blue.
Setup via printer to wifi

- To start with this setup via this method, you need to ensure that your Wifi access point or the router you are using has a WPS symbol or not.
- Now bring the printer near the wifi access point.
- Once the printer and the wifi access point are in close range, press the WPS button on your wifi access point, and hold the wifi button for five seconds. If the indicator flashes the blue light, it means your computer and printer are connected.
Ad-hoc Mode
With this method, you can easily connect your printer to your computer or your mobile without requiring any wifi-access point.

- To start with this method, press and hold the wifi button on your printer for around one second. Pressing the button for one second will turn on the wifi on your printer.
- Now use your computer to configure the Ad-hoc mode settings of your printer. In the case of a Windows PC, you will have to connect your computer to your printer with the help of a USB cable. Now open the printer setting tools, and click on the communication settings button. Under the General tab, select wireless LAN for the selected interface.
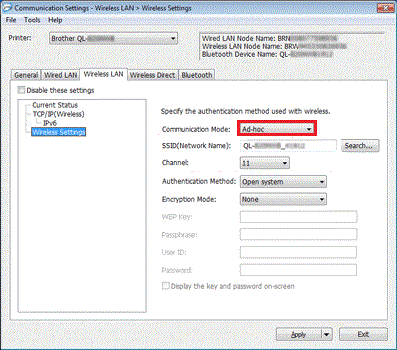
- Then under the Wireless LAN tab, go to the wireless setting, and select Ad-hoc for communication mode. In the case of a mac computer, start the wireless device setup wizard in the printer driver package.
- Now use your device to select the SSID of your printer, and if you have the password on your printer setting tool, then enter it. The indicator light will turn blue when the connection is successfully established between the device and the printer.
- even after the setup if printer is offline then please reset the printer to default settings and try again.
we hope this may help you connect brother Printer to the wifi network.


